Quilting Tips: Adjusting Thread Tension
Share

There is nothing more frustrating than stitching a seam and then seeing that the stitches are imperfect. You may need to adjust the thread tension, but before you do that, try a couple of other simple things first.
Troubleshooting the problem:
If those things fail, then you will need to adjust the thread tension of your machine. Adjusting the tension may be slightly different for each sewing machine and you should check your machine’s manual, but below are some guidelines to follow.
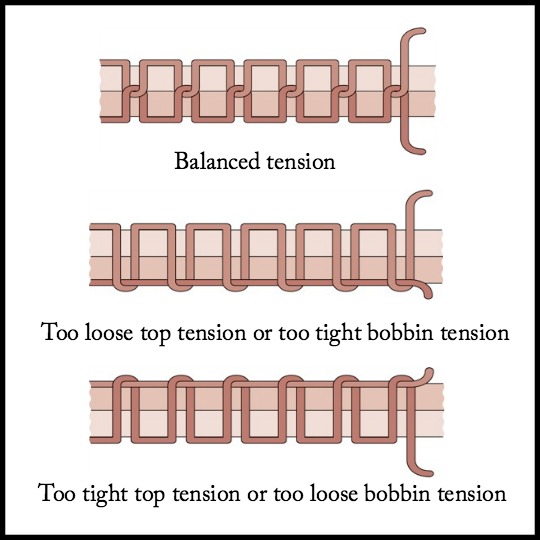
As you work through the problem know that thread tension is actually a tug-of-war between the bobbin thread and the top thread in you sewing machine.

The top tension is easy to find on your machine. It is usually a dial with numbers, the larger the number the tighter the tension. To correct the tension, turn the dial in tiny increments—either tighter or looser and test to see if that works. Continue until you get the right tension.
If adjusting the top tension doesn’t create a balanced stitch, you will need to adjust the bobbin tension by turning the screw on the bobbin.
Turn the screw to the right (clockwise) to tighten and to the left (counterclockwise) to loosen. Again make small adjustments at a time and then test by stitching a line. It is a good idea to use a permanent marker to make a small mark at the original location of the screw. This will help you know where you began. Then if you have adjusted it to accommodate for heavier top thread or for satin stitching or for some other reason, you can get back to the original place. Don’t be afraid to adjust the bobbin tension, but do use it as the last step in your troubleshooting process.
Know that occasional problems with thread tension are inevitable, and it is just a matter of learning how to troubleshoot and adjust the tension. If you have continual problems with tension, it might be time to take your machine in to the repair shop for maintenance.
Happy quilting!
The Tech Editors


