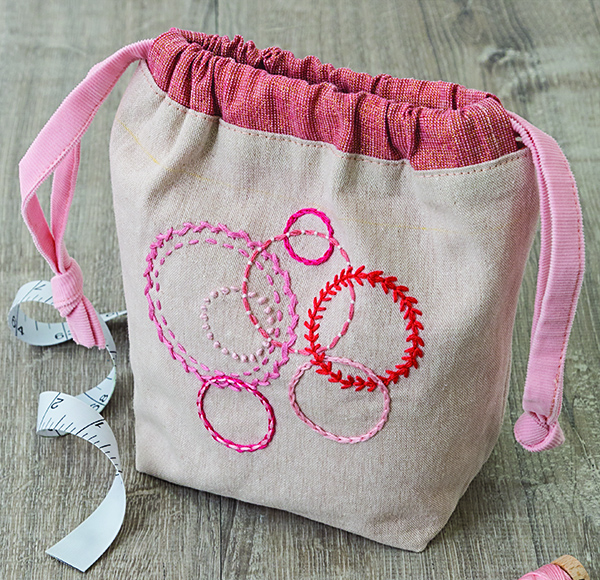
Circles Embroidery on Drawstring Pouch

From Stitch & Sew
By Aneela Hoey
Class Description:
This class is suitable for all skill levels from beginner to experienced. The sampler style of the project allows students to learn a variety of embroidery stitches. More advanced stitchers can develop their existing skills by incorporating techniques such as lacing or couching for fun new effects. Students will take away either a completed embroidery or a finished embroidered drawstring pouch, depending on the class length chosen. During the class, students should discover how relaxing and therapeutic embroidery can be. A photo of Circles Drawstring Pouch can be found on p. 72.
Class Length:
3 hours: The class can be offered as a shorter embroidery class where the focus is on learning basic stitches or developing stitching skills. Students complete the embroidery in class and can finish by sewing the drawstring pouch at home.
6 hours (two separate 3-hour sessions): In the first session, students will make the embroidery, then take it home to wash away pattern marks and dry; in the second session, students will sew the finished piece into the embroidered drawstring pouch.
Class Supply List:
Required text: Stitch & Sew by Aneela Hoey
For both classes:
• 3/8 yard Yarn Dyed linen or solid-colored quilting cotton
• 8–10 colors of embroidery floss
• 8” embroidery hoop
• Embroidery needles, sizes 3–9
• Tapestry needle, size 24
• Pincushion
• Embroidery marking pen, water-soluble
• Small pair of fabric scissors
• Rotary cutter
• Ruler
• Cutting mat
• Thimble
• Paper tape or washi tape
• 1 sheet C&T Publishing Wash-Away Stitch Stabilizer (see note below)
Note: If using Yarn Dyed linen, dark-colored quilting cotton, or other fabric that is difficult to see through enough to trace the design, the student will need 1 sheet C&T Publishing Wash-Away Stitch Stabilizer printed at home (see p. 15 for instructions) with the Circles design and brought to class. Alternatively, the class teacher could print copies onto the stabilizer and hand out to students during the class.
Additional supplies for 6-hour class:
• 3/8 yard light-colored quilting cotton for lining
• 1/8 yard solid quilting cotton, lawn or fine ribbed corduroy for channel
• 1/4 yard solid quilting cotton, lawn or fine ribbed corduroy for ties
• Sewing machine
• Sewing machine needles
• Sewing thread
• Pins
• Hand-sewing needle
• Water-soluble fabric pencil or Chaco liner
• Seam ripper
• Optional: Clover bodkin
• Optional: Clover 1” bias tape maker
• Optional: point turner
TIP: Take advantage of these sales opportunities:
• Wash-Away Stitch Stabilizer (C&T Publishing)
• Fabrics such as Essex Yarn Dyed linens by Robert Kaufman
• Fabrics such as solid-colored cotton lawn and corduroy for linings etc.
• Embroidery floss
• Aurifil 12wt wool thread
• Clover 1” bias tape maker
• Clover binding clips
• Clover point turner
• Clover awl
Classroom Preparation:
3-hour class: Each student will require table space for hand stitching. One ironing station is required by every six students for pressing fabric prior to stitching.
6-hour class: For the first session requirements, see above. For the second session, each student requires table space for sewing and cutting and access to an electrical outlet. An ironing station will be required for every three students.
Class Agenda:
Instructions for the Circles embroidery can be found on p. 72. Instructions for the Drawstring Pouch project can be found on p. 68. Embroidery stitch instructions start on p. 18. Advanced embroidery techniques start on p. 32.
For both classes:
1. Cut fabric for pouch front.
2. Transfer Circles design onto fabric, positioning it as per instructions on p. 68.
3. Place fabric in hoop and tighten.
4. Embroider each circle element of the design using a different stitch
5. Go over instructions for washing and drying embroideries at home (p. 17).
Additional steps for 6-hour class:
At home (prior to second session): Students should wash and dry the embroidery to remove pattern marks, following the instructions on p. 17.
In class:
1. Cut fabric for remaining pieces.
2. Sew the pouch.
3. Insert the ties.


