Free Project from Make Star Quilts
Posted by Deirdre Quirk on May 11th 2017
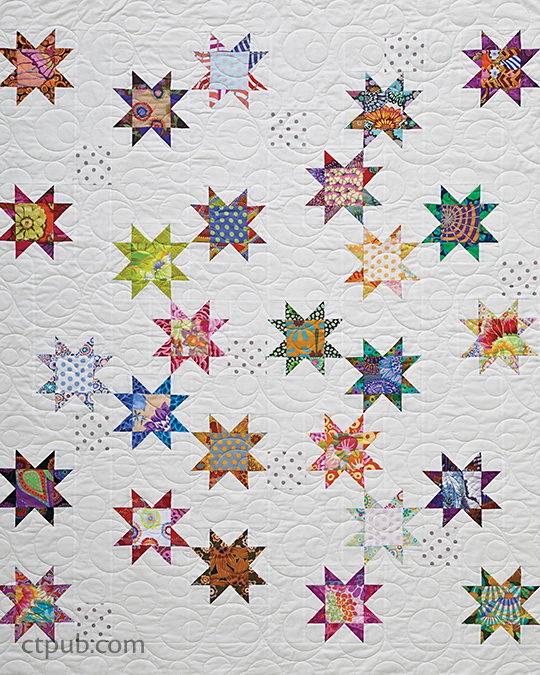
We're so excited to share another free project with you! This one is called Seeing Stars, by Alex Anderson, and is from Make Star Quilts.
FINISHED QUILT: 48 1/2˝ × 54 1/2˝
FINISHED BLOCK: 6˝ × 6˝
TOTAL NUMBEROF STAR BLOCKS: 27
I love Star quilts, so I guess it’s no surprise that I would include one in this book. I decided to emphasize the star motif by making the star points darker than the star centers (or “bellies”) and—taking my cue from modern quilters—chose a fresh, sparkling white for the background. As a finishing touch, I dropped in a few random polka dot squares for visual interest and to complement the polka dots I used in some of the blocks.
Designed and pieced by Alex Anderson; machine quilted by Dianne Schweickert
Materials
Fabric amounts are based on a 42˝ fabric width.
ASSORTED LIGHT TO DARK COLORFUL PRINTS: 1 yard total for stars
WHITE SOLID: 3 yards for block backgrounds, filler strips, filler squares, outer border, and binding
LIGHT PRINT: 1/4 yard for filler squares
A TEAL AND A BLUE SUBTLE PRINT: 1/8 yard of each for flat piping
BACKING: 3 yards of fabric (horizontal seam)
BATTING: 53˝ × 59˝
Cutting
All measurements include 1/4˝-wide seam allowance. Cut strips on the crosswise grain of the fabric (selvage to selvage) unless otherwise noted. See the introduction to Piecing the Blocks (next page) for the number and combination of pieces you’ll use for each block.
ASSORTED COLORFUL PRINTS
Cut 108 squares 2 3/8˝ × 2 3/8˝ in matching sets of 4 for star points.
Cut 27 squares 3 1/2˝ × 3 1/2˝ for star centers.
WHITE SOLID—LENGTHWISE GRAIN
Cut 2 strips 3 1/2˝ × 42 1/2˝. Cut 2 strips 3 1/2˝ × 54 1/2˝.
REMAINING WHITE SOLID
Cut 27 squares 4 1/4˝ × 4 1/4˝ for star-point units.
Cut 108 squares 2˝ × 2˝ for block corners.
Cut 11 squares 6 1/2˝ × 6 1/2˝ for large filler squares.
Cut 20 rectangles 3 1/2˝ × 6 1/2˝ for filler strips.
Cut 4 rectangles 3 1/2˝ × 12 1/2˝ for filler strips.
Cut 1 rectangle 3 1/2˝ × 9 1/2˝ for filler strip.
Cut 4 squares 3 1/2˝ × 3 1/2˝ for small filler squares.
Cut 6 strips 2 1/8˝ × the fabric width for binding.
LIGHT PRINT
Cut 9 squares 3 1/2˝ × 3 1/2˝ for filler squares.
BLUE AND TEAL PRINTS—FROM EACH
Cut 3 strips 1˝ × the fabric width.
Construction
PIECING THE BLOCKS
For each of these blocks, use 4 matching 2 3/8˝ × 2 3/8˝ squares for the star points, a square 3 1/2˝ × 3 1/2˝ cut from a different print for the star center, and a square 4 1/4˝ × 4 1/4˝ and 4 squares 2˝ × 2˝ cut from the white solid for the background.
1. Use 4 matching print squares 2 3/8˝ × 2 3/8˝ and a white square 4 1/4˝ × 4 1/4˝ to make 4 Flying Geese units.

Make 4 Flying Geese units.
2. Arrange the 4 units from Step 1, an assorted print 3 1/2˝ × 3 1/2˝ square, and 4 white 2˝ × 2˝ squares as shown. Sew the units and squares together into rows; press. Sew the rows together; press.
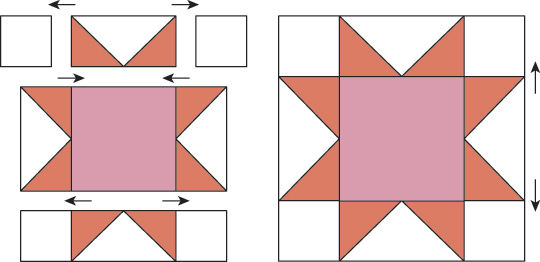
Sew units and squares together into rows.
3. Repeat Steps 1 and 2 to make a total of 27 Star blocks.
QUILT ASSEMBLY
1. Arrange the blocks, the large and small filler squares, and the filler strips as shown in the quilt assembly diagram.
2. Sew the blocks, squares, and strips together in “neighborhoods” as shown; press.
3. Sew the neighborhoods together; press so that seams fall in opposite directions whenever possible.
4. Sew the 3 1/2˝ × 42 1/2˝ white outer-border strips to the top and bottom of the quilt. Press the seams toward the border. Sew the 3 1/2˝ × 54 1/2˝ white outer-border strips to the sides of the quilt; press.
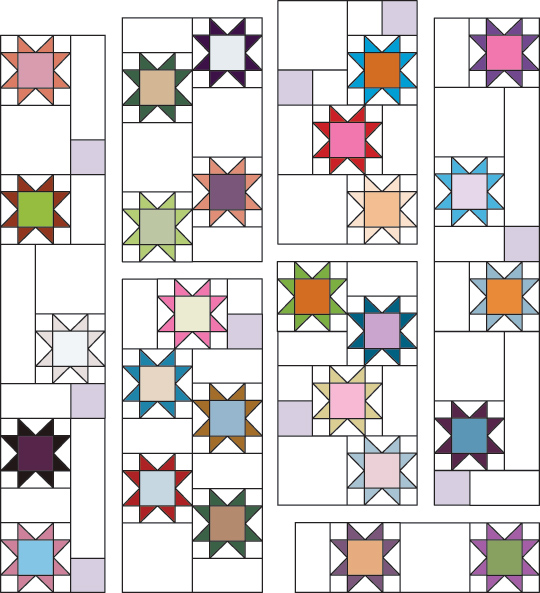
Quilt assembly
FINISHING
1. Layer and baste the quilt, and then quilt as desired. Dianne machine quilted an overall motif of large bubbles and swirls over the entire quilt, picking up on the circles in the many polka dot fabrics.
2. Sew the 1˝-wide blue and teal strips together end to end with diagonal seams, and press the seams open. Fold the strip in half, wrong sides together, and press.
3. Trim the batting and backing even with the raw edges of the quilt top. Measure the quilt through the center from top to bottom and from side to side. Cut 2 strips to each measurement from the folded blue/teal strip. With right sides together and raw edges aligned, use a machine basting stitch and a scant 1/4˝ seam to sew the piping strips to the sides, top, and bottom of the quilt.
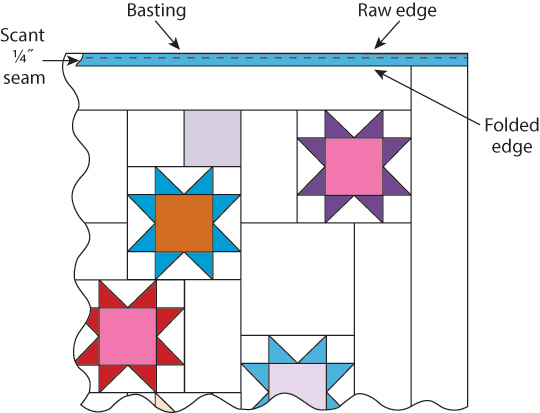
Add piping.
4. Sew the 2 1/8˝-wide white binding strips together end to end with diagonal seams, and use them to bind the edges of the quilt.
ALEX ANDERSON is a founding partner, executive producer, and co-host of the web TV’s The Quilt Show with Ricky Tims, as well as founding partner of The Quilt Life magazine. She has authored 30 books that have sold a combined total of nearly one million copies. Alex lives in Northern California.
WEBSITE: alexandersonquilts.com
This project originally appeared in Scrap Quilting with Alex Anderson by Alex Anderson.

