Doll Dress Boutique Blog Tour Kickoff!
Posted by Erin Hentzel on Nov 12th 2018
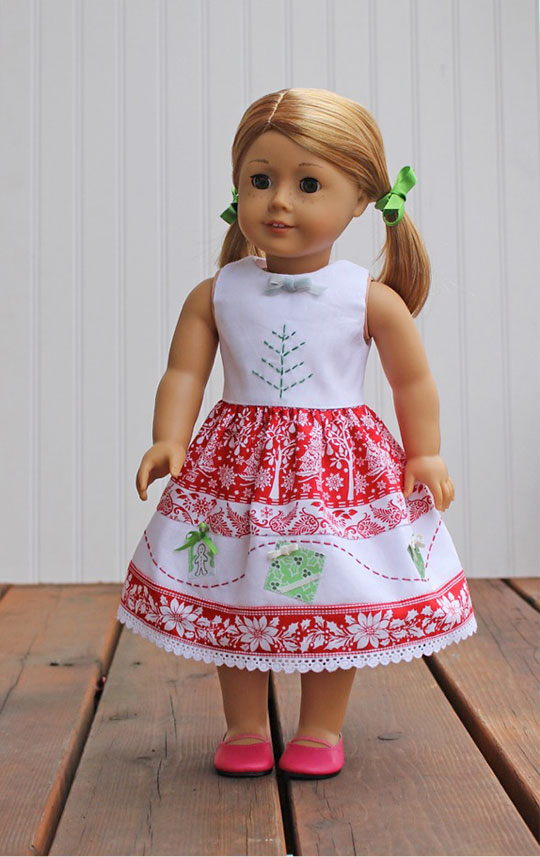
Welcome to the kick-off of the Doll Dress Boutique book tour. I'm so excited to share some additional bonus designs to add to the collection of patterns in Doll Dress Boutique. With the holidays just around the corner, it seems appropriate to start with this fun holiday dress that I envisioned while working on my book.

One of the most popular games kids play with their dolls and stuffed animals is holidays. I always loved peeking in on their dramatic play and seeing how they act out the holidays with their American Girl dolls. This dress can be for their doll's special Christmas party or for Christmas day.
Bonus Design: O Tannenbaum
Let's get right to it.

Materials
White fabric: 1/4 yard
Red and white holiday-print fabric: 1/4 yard
Scraps of green fabrics for the appliqués
Lace: 3/4 yard
1/8" wide ribbons: several 1/4 yard pieces
1/4" wide velvet ribbon: 1/8 yard
Sulky© 12 wt cotton threads, red and green
Fusible web
Tear-away stabilizer (optional)
Download the free tree template HERE.
Cutting Instructions
Bodice patterns #13 and #14 from Doll Dress Boutique
Follow the instructions on page 31 for View D of the Classic Sleeveless Dresses, Love Notes Dress, for cutting the three skirt pieces.
Sewing Instructions
Bodice
1. Hand stitch the tree design onto the bodice front using double strands of green thread. You can trace the design onto the fabric, using a disappearing fabric marker. I like to use tear-away stabilizer. Trace the design onto the stabilizer and pin it to the bodice front. Center the design and make sure the bottom of the design is at least 1/2'' from the lower edge.

To keep my stitches even, I mark my thumbnail with the stitch length and gap length.

Once sewn, carefully remove the tear-away stabilizer.


2. Sew the bodice together according to the instructions on page 33.
Skirt
1. Follow the instructions on page 33 for sewing the embroidery design.
2. Cut a strip of fusible web 1 1/2" wide and fuse it to the wrong sides of the green fabric scraps.

3. Use a rotary cutter to cut squares for the presents: 1 1/4" squares and 1" squares.

4. Fuse the squares onto the white middle skirt piece and stitch them in place as close to the raw edges as possible.
5. Cut pieces of ribbon to "wrap" the presents and seal the edges of the ribbon pieces. Sew the ribbons in place.


6. Sew the three skirt pieces together, with right sides together. Finish the seam allowances and press them away from the white middle skirt piece.

7. Hem the skirt with lace, following the instructions on page 12.

8. Following the instructions on page 14, sew the skirt to the bodice.
9. Follow the instructions on page 16 to sew the center back seam and closure. Once the center back seam has been sewn, fuse and sew a present to cover the embroidery stitching if it doesn't align well.

Finishing
1. Make tiny bows for the presents and bodice. Seal the ribbon ends.
2. Hand sew the ribbons in place.

Tree Ornaments
I like the look of the tree plain, but you can see it would also look cute with buttons or sequin ornaments.

I hope you enjoy making a festive holiday for your doll or for that special young person in your life.

Follow along with the blog tour:
Monday, November 12: C&T Publishing
Tuesday, November 13: Jane Wilkes, Janie Caroll Designs
http://www.janiecarrolldesigns.com/
Wednesday, November 14: Kelly, Sulky
Thursday, November 15: Teri, Terifications
Friday, November 16: Julie, Riley Blake Designs
https://imaginewithrileyblake.com/blog/
Monday, November 19: Cherry, Cherry Blossoms Quilting
http://www.cherryblossomsquilting.com/blog/
Tuesday, November 20: Tammy, Tamarinis
Wednesday, November 21: Erin, Avery Lane Sewing
http://averylanesewing.com/the-blog/
Oh, and one last thing! C&T is giving away an ebook copy of Doll Dress Boutique. You can enter the giveaway here: a Rafflecopter giveaway.


